A few things to have ready
Before you start
A connector is a secure link that lets your AI assistant use FeedX. MCP, short for Model Context Protocol, is the standard behind that link. You only need to add FeedX’s address and sign in.
- A FeedX account and a workspace you can access. A connected store is useful for product content; a Standalone workspace works with your own media.
- A ChatGPT, Claude, Perplexity, or Grok account that lets you add a custom connector. “Custom” just means you add the connection yourself. Your plan or organization may limit this feature.
- Social accounts connected in FeedX when you want to schedule or publish. You can explore your workspace before connecting a social destination.
The FeedX connection is included with Free, Lite, Pro, and Business. Your normal FeedX usage limits still apply. A FeedX plan does not include a paid ChatGPT, Claude, Perplexity, or Grok subscription.
Use these settings for every assistant
Copy these details when asked
- Name
- FeedX
- MCP server URL
https://mcp.feedx.app/mcp- Authentication
- OAuth — sign in with your FeedX account
- Transport, if asked
- Streamable HTTP — choose this connection option
Copy the whole address, including /mcp at the end. Enter your password only on FeedX’s sign-in page, never in the chat.
01 · ChatGPT
Connect FeedX to ChatGPT
Start in ChatGPT while signed in. First, allow your account to add a connection. Then add FeedX.
-
Open your account menu
Click your name or profile picture at the bottom left of ChatGPT. A menu like this appears.
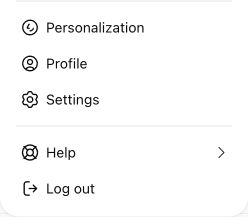
Look for Settings in the account menu. The account name above it has been cropped out. -
Click Settings
This opens the settings window shown below.
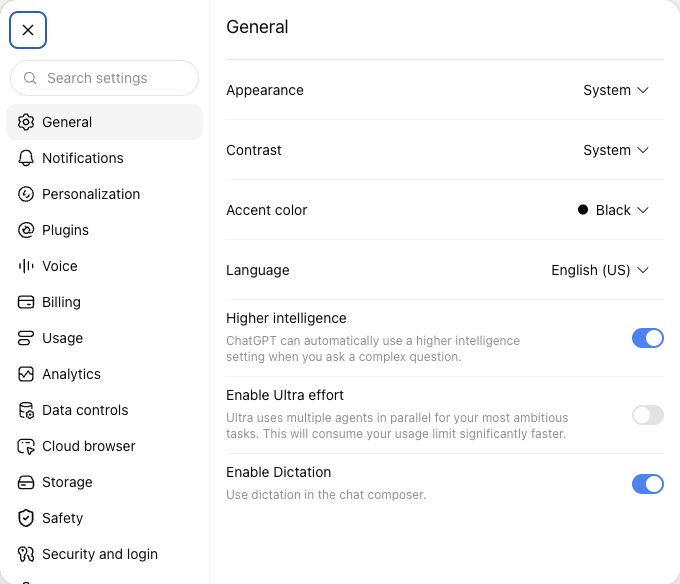
The left menu contains Security and login, near the bottom. -
Click Security and login
Use the left menu in the settings window above.
-
Scroll to Developer mode
Look for this section on the Security and login page.

A blue switch means the setting is already on. -
Turn on Developer mode
If the top switch is off, turn it on. If it is already blue, leave it on. Keep the separate Enforce CSP in developer mode setting on too. Developer mode is simply ChatGPT’s name for allowing these manual connections.
-
Open the Plugins page
Use this link: Open ChatGPT Plugins. It opens in a new tab so you can keep this guide beside it.

The plus button is beside Search plugins. -
Click the plus button
This button is also labeled Create app. It opens a form titled New Plugin.
-
Fill in the New Plugin form
Use the values below. You can leave Icon empty.
- Name
- FeedX
- Description
- Plan social content with FeedX.
- Connection
- Server URL
- Server URL
https://mcp.feedx.app/mcp- Authentication
- OAuth
OAuth means you will sign in with your FeedX account. Leave Advanced OAuth settings at their defaults; you do not need to enter a client ID or secret.

Your form should use the same FeedX address and OAuth setting. -
Read the notice at the bottom
Scroll down inside the form. Read the notice and check its box only if you trust FeedX and want to connect it.
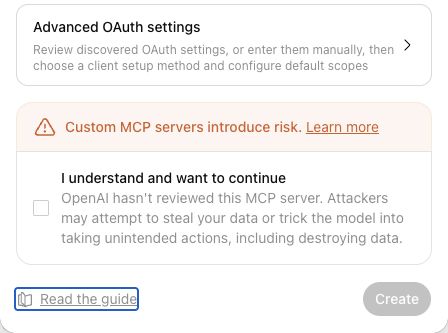
Read the notice before checking the box. The screenshot shows the box unchecked. -
Click Create
Use the Create button at the bottom of the form shown above.
-
Sign in to FeedX
Follow the sign-in prompt that opens. Enter your details on the FeedX page.
-
Review the requested access
Approve it if you want ChatGPT to connect to this FeedX account.
-
Open a new chat
Return to ChatGPT’s new chat page.
-
Click the plus button beside the message box
This opens the menu for files, tools, and your installed plugins.
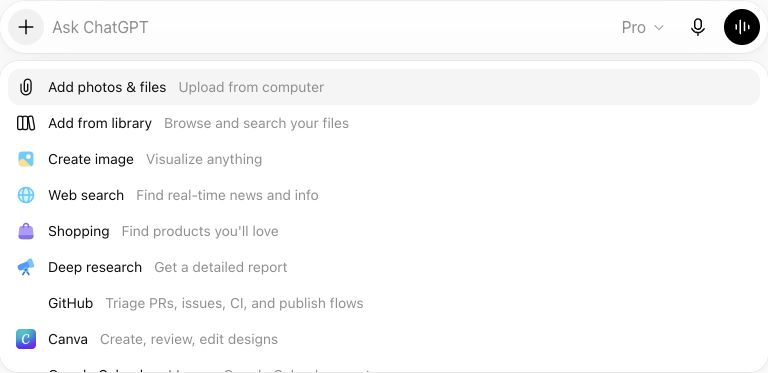
Your installed plugins appear in this menu. This example shows where to look; FeedX is not installed in the pictured account. -
Select FeedX
Look for FeedX among your installed plugins. If it is missing, check that the earlier connection steps finished successfully, then open a new chat. Once selected, try the first prompt below.
Screenshots captured September 4, 2026. Account identity and chat history are cropped out for privacy. Select an image to view it at full size.
If the setting is unavailable, check your account or workspace policy. OpenAI’s current connection instructions ↗
02 · Claude
Connect FeedX to Claude
Start in Claude while signed in. Follow the menu steps below, or open Connectors settings directly and start at step 3.
-
Open your account menu
Click your name or profile picture at the bottom left of Claude.
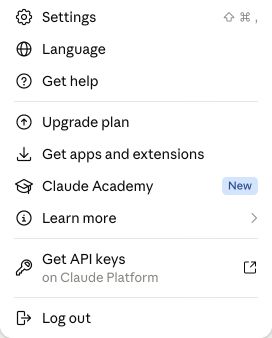
Settings is at the top of this menu. Account details have been cropped out. -
Click Settings
The settings menu appears on the left. Look for Connectors under Customize.
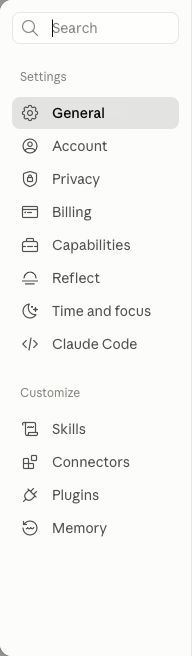
Choose Connectors, just below Skills. -
Click Connectors
This page lists your connections. If FeedX or FeedXApp is already there, use the existing connector instead of creating a duplicate.
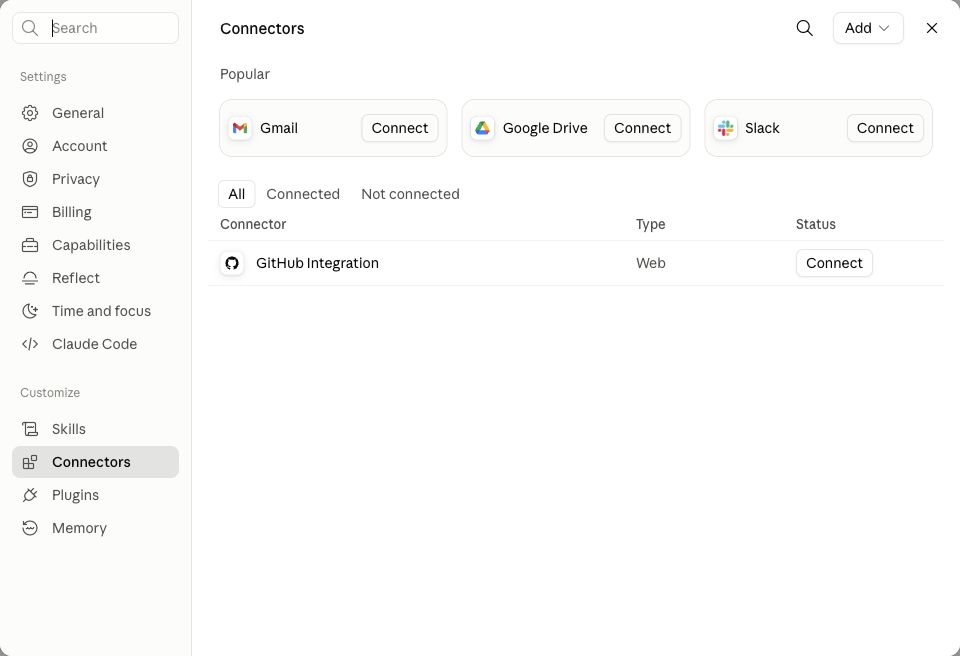
The Add button is at the top right of the Connectors page. -
Click Add
A menu opens with Add custom connector.

Choose Add custom connector from this menu. -
Click Add custom connector
This opens the form shown below.
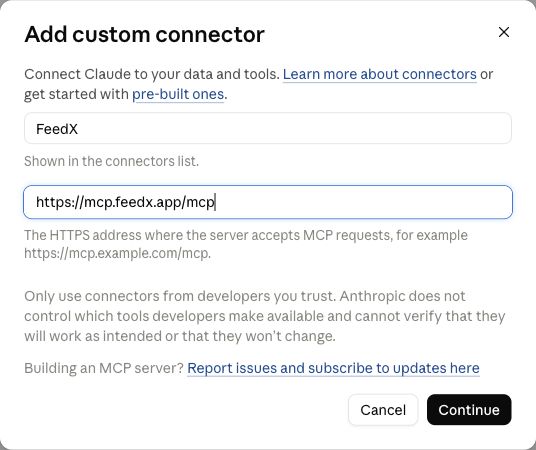
The completed form uses FeedX and the full address ending in /mcp. -
Enter FeedX in the first field
This is the name that will appear in your connectors list.
-
Paste the FeedX address into the second field
Use
https://mcp.feedx.app/mcp, exactly as shown in the form above. -
Click Continue
Read the notice before continuing. Follow the connection prompts Claude shows next. If you see optional OAuth Client ID or Client Secret fields, leave them empty; FeedX handles those connection details automatically.
-
Sign in to FeedX
If Claude shows a Connect button, click it to open sign-in. Enter your details on the FeedX page.
-
Review the requested access
Approve it if you want Claude to connect to this FeedX account.
-
Check that FeedX is connected
Return to Connectors. A checkmark beside FeedX means the connection is ready. An older connection may be named FeedXApp.
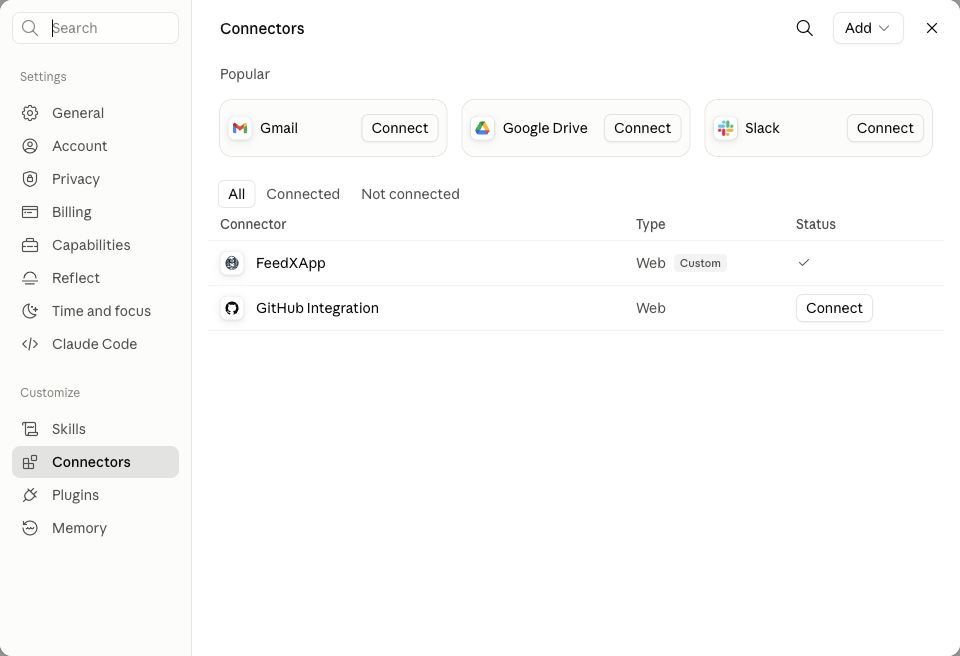
The checkmark in the Status column confirms this connection is complete. -
Open FeedX to view its available actions
Click the FeedX row. Tool permissions means the actions Claude can ask FeedX to perform. Needs approval means Claude will ask you before using that action; you can leave that setting as it is.
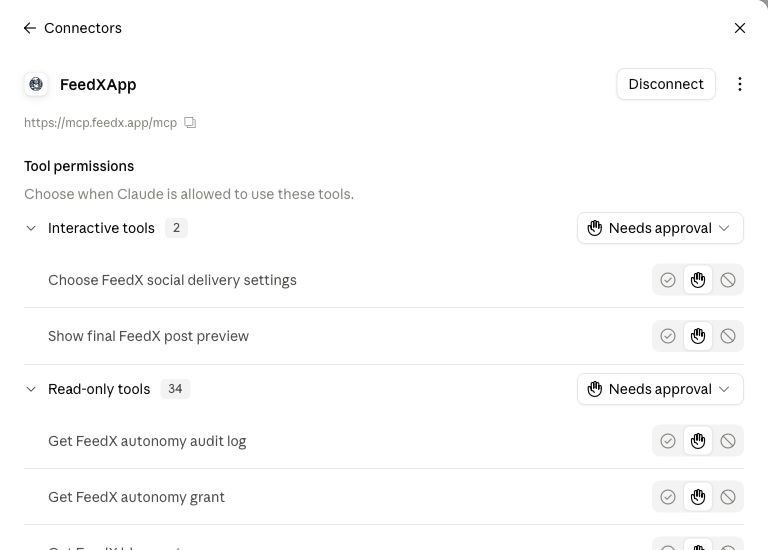
FeedX’s actions are listed here after connecting. You do not need to change these approval settings to get started. -
Open a new chat
-
Click the plus button beside the message box
This opens the menu for files and connectors.
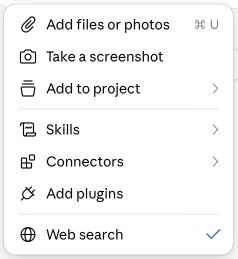
Connectors appears in this menu, below Skills. -
Select Connectors
Your available connectors appear in a second menu.
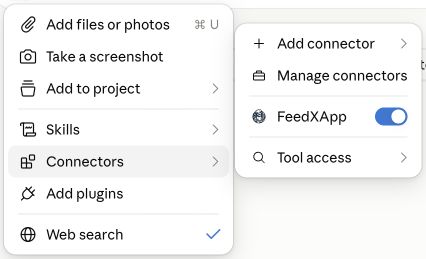
The blue switch beside FeedXApp means FeedX is enabled for the chat. -
Turn on FeedX
If its switch is off, click it. If it is already blue, leave it on. Then try the first prompt below.
Already added FeedX?
Open FeedX or FeedXApp in the Connectors list. If it has a checkmark, it is already connected. If you see Connect, click it and complete the FeedX sign-in and permission prompts.
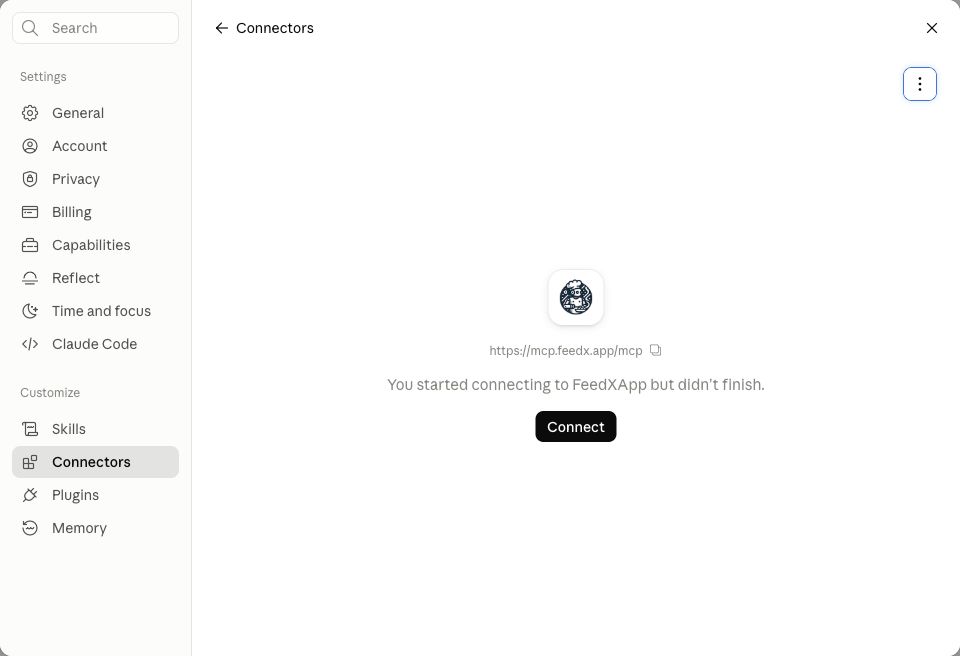
If Claude reports that this address already exists, return to the list and open the existing connector. If your plan’s custom connector limit is reached, check that list before trying to add another.
Screenshots captured September 4, 2026. Account identity and chat history are cropped out for privacy. Select an image to view it at full size.
Using Claude through your company? Your owner may need to add FeedX in Organization settings → Connectors → Add → Custom → Web first. Each member then signs in with their own FeedX account.
03 · Perplexity
Connect FeedX to Perplexity
These steps apply when your Perplexity account shows + Custom connector on its Connectors page. If that button is missing, check your plan or ask your organization’s admin whether custom connectors are available.
-
Open your account menu by clicking your profile at the bottom left of Perplexity.
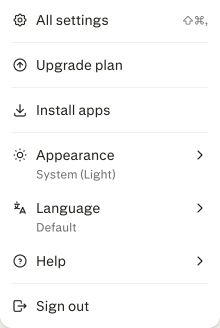
All settings is at the top. Account details have been cropped out. - Click All settings.
- Select Connectors. You can also open the Connectors page directly.
- Select + Custom connector.
- Choose Remote. This means FeedX connects over the internet.
- Enter FeedX in the Name field.
- Paste
https://mcp.feedx.app/mcpinto MCP Server URL. - Choose OAuth under Authentication. This uses your FeedX sign-in. Leave optional Client ID and Client Secret fields empty; FeedX sets those up automatically.
- Choose Streamable HTTP under Transport.
- Review the custom connector notice and check its acknowledgement box if you agree.
- Select Add.
- Open the FeedX connector card to begin signing in.
- Sign in on the FeedX page.
- Review and approve the requested access if you want to connect this account.
- Enable FeedX in your conversation using Perplexity’s connector controls.
For an organization, an admin may need to allow custom connectors or share FeedX with members. Each person should connect the FeedX account that has access to their workspace.
Menu screenshot captured September 4, 2026, with account details cropped out. The remaining steps follow Perplexity’s guide; the Add custom connector option was unavailable in our test account.
04 · Grok by xAI
Connect FeedX to Grok
Open Grok Connectors while signed in. Grok discovers FeedX’s tools and starts the FeedX OAuth sign-in automatically.
- Click New Connector and choose Custom.
- Name the connector FeedX and enter
https://mcp.feedx.app/mcpas the server URL. - Add the connector, then continue when Grok opens the FeedX sign-in and permissions screen.
- Sign in to FeedX and approve access. Return to a new Grok chat and enable FeedX from the connector controls when you need it.
If your Grok account does not show Custom, check your plan or ask your organization administrator to enable custom connectors. Do not enter a FeedX password, client secret, or token into Grok.
You are connected. Now make it useful.
Start with your workspace
With FeedX enabled, send this in any of the four assistants:
Use FeedX. Show my available workspaces, confirm the one we are using, and explain what I can do there. Do not create or publish anything yet.
FeedX can use your selected or only workspace automatically. If you have several, choose the workspace and brand by name. Check the name before asking for content.
Find three products from my catalog for a weekend promotion. Show their current details, then help me choose one for a draft.
No store? Try: “Help me prepare a social caption for my approved image. Check whether FeedX can access the exact file before creating a draft.”
Create your first post →When something does not connect
Common setup questions
I cannot find “Add custom connector.”
Check the AI platform’s current guide linked above. Custom connections may require a different plan or an organization owner’s permission. If Claude says the custom connector limit is reached and FeedX is already listed, open that existing connector and select Connect; you do not need a duplicate. UI labels can change as features roll out.
Claude says this address already exists.
FeedX has already been added. Return to Settings → Connectors and open FeedX or FeedXApp. Click Connect if shown, then finish signing in to FeedX. A checkmark means it is already connected. You do not need to add or remove another connector.
I see “invalid_client” or a sign-in error.
Check that the address is exactly https://mcp.feedx.app/mcp. Leave optional Client ID and Client Secret fields empty unless FeedX gave you specific values. Try connecting again. If it still fails, contact FeedX with the AI platform name and a screenshot of the error. Hide personal information and any long sign-in codes or tokens first.
The connector asks me to enter a client ID or secret.
These are connection details normally set up automatically. Leave the fields empty if they are optional. If the page will not let you continue, contact FeedX with the platform and account type. Do not put your FeedX password or social account password in either field.
FeedX is connected but the assistant cannot use it.
Enable FeedX in the current conversation, start a new chat, and explicitly say “Use FeedX.” Refresh the connection’s tools if that option is available. Reconnect if the sign-in has expired.
I cannot see the expected store or social account.
Check that you signed in with the correct FeedX account. Ask the assistant to change to the right workspace and brand. Add or reconnect social destinations in FeedX when needed.
A preview or TikTok settings page does not open.
Ask the assistant for a fresh one-time FeedX settings link. No sign-in is needed. Complete each TikTok account on that form, then return to the conversation and say Done before scheduling or publishing.
Understand the connection
What is MCP?
MCP stands for Model Context Protocol. Think of the FeedX connector as a secure link between your AI assistant and your FeedX account. It lets the assistant look up your current products and help with tasks such as saving a draft. FeedX checks that you have permission to use the workspace and perform the action.
Is this an official marketplace listing?
This guide covers adding FeedX manually as a custom connector. It does not require a marketplace listing or imply endorsement by OpenAI, Anthropic, Perplexity, or xAI.
What am I giving the assistant access to?
Review the access shown on FeedX’s permission screen before you approve it. FeedX checks your account and workspace permissions for each request. Information shared by FeedX appears in your AI conversation, so that platform’s privacy settings and policies also apply.
Will connecting immediately publish a post?
No. Connecting grants access; it does not create a post. Review the content, destination accounts, and time before approving a schedule or publish action. Your AI platform may also ask you to confirm an action.
Do all four assistants have identical features?
They connect to the same FeedX tools. File sharing, image generation, interactive previews, and confirmation screens depend on the assistant. FeedX also checks your workspace, plan, and social channel requirements.
Can I disconnect later?
Yes. Disconnect or remove FeedX in the AI platform’s connector settings. This stops that connection from being used there. Review existing schedules in FeedX separately: disconnecting an assistant does not cancel work already scheduled.